https://github.com/triton-inference-server/server
https://docs.nvidia.com/deeplearning/triton-inference-server/release-notes/index.html
深度学习部署神器——triton-inference-server入门教程指北
triton-inference-server的backend(一)——关于推理框架的一些讨论
Triton Inference Server是Nvida开源的机器学习推理引擎(可以理解为同TF Serving对等的产品),其提供了多种开箱即用的功能帮助我们快速落地AI模型到生产环境以提供业务使用。当我们团队人手资源受限或开发时间不足的情况下,没有能力自研一套机器学习推理引擎,Triton是一个非常好的选择。
从Triton的不断完善的进程来,其已经逐渐的具有了一个深度学习推理引擎应该所具有的的全部功能(当然还是有一些不够完善的地方)。
Triton Inference Server核心的几个功能:
- 多框架支持:Triton支持了几乎所有主流的机器学习框架,例如Tensorflow、TensorRT、Pytorch、Python、ONNX等;同时也可以custom backend的方式来扩展解码引擎。
- 高性能:Triton提供了dynamic batching、concurrent execution、optimal model configuration、model ensemble、dali model 等策略来提升在线推理的性能;同时也提供了perf analyze和model analyze工具来辅助我们进行性能调优。
- MLOps:Triton提供了Prometheus exporter、模型在线更新、http server 、grpc server等多种在线服务策略以满足用户生产场景多样化的部署和运维需求
triton可以充当服务框架去部署你的深度学习模型,其他用户可以通过http或者grpc去请求你搭建的服务,相当于你用flask搭了个服务供别人请求,当然相比flask的性能高很多了。triton也可以摘出C-API充当多线程推理服务框架,去除http和grpc部分,适合本地部署多模型,比如你有很多模型要部署,然后分时段调用,或者有pipeline,有了triton就省去你处理显存、内存和线程的麻烦。
借用官方的图,triton的使用场景结构如下:
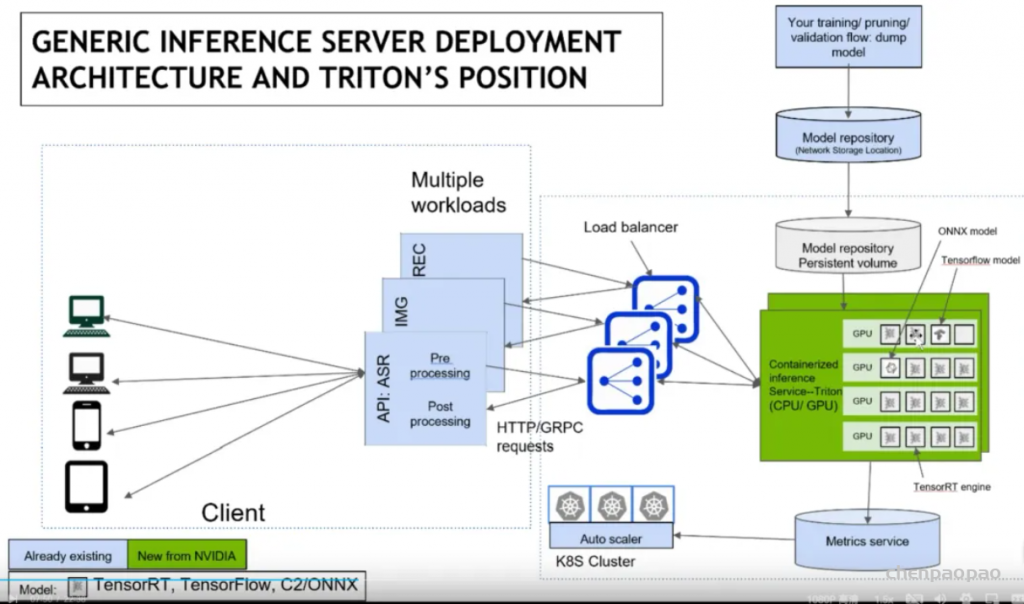
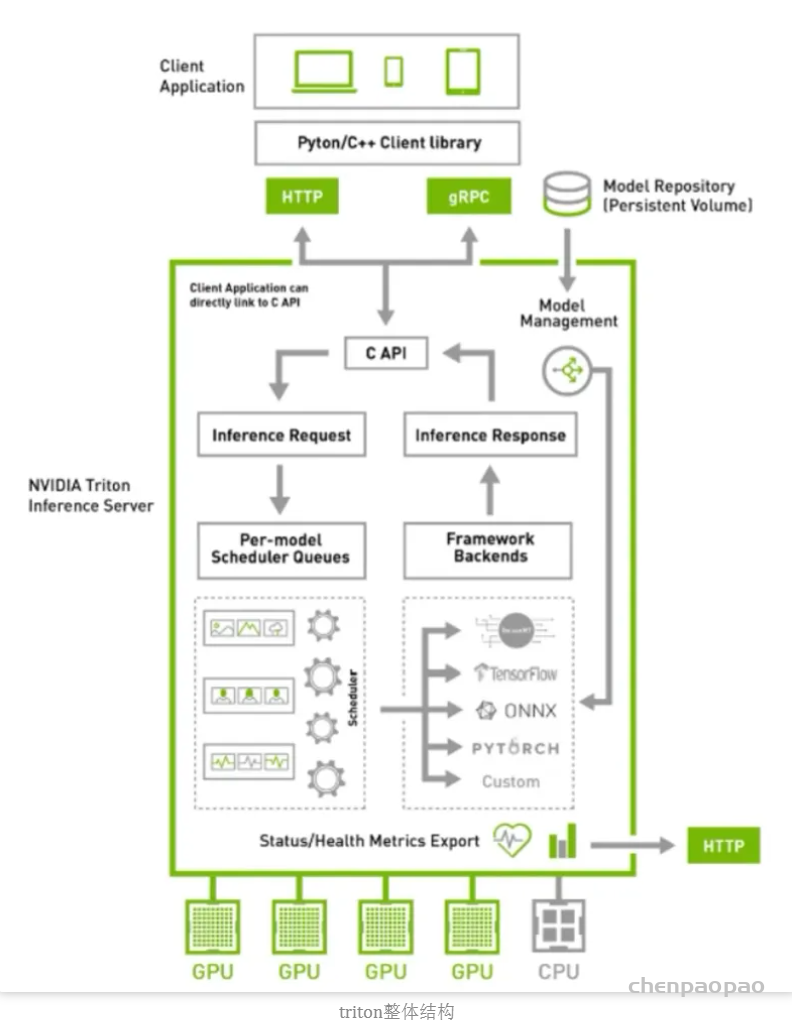
涉及到运维部分,我也不是很懂,抛去K8S后,结构清爽了些:
triton的一些优点
通过上述的两个结构图,可以大概知道triton的一些功能和特点:
- 支持HTTP/GRPC
- 支持多backend,TensorRT、libtorch、onnx、paddle、tvm啥的都支持,也可以自己custom,所以理论上所有backend都可以支持
- 单GPU、多GPU都可以支持,CPU也支持
- 模型可以在CPU层面并行执行
- 很多基本的服务框架的功能都有,模型管理比如热加载、模型版本切换、动态batch,类似于之前的tensorflow server
- 开源,可以自定义修改,很多问题可以直接issue,官方回复及时
- NVIDIA官方出品,对NVIDIA系列GPU比较友好,也是大厂购买NVIDIA云服务器推荐使用的框架
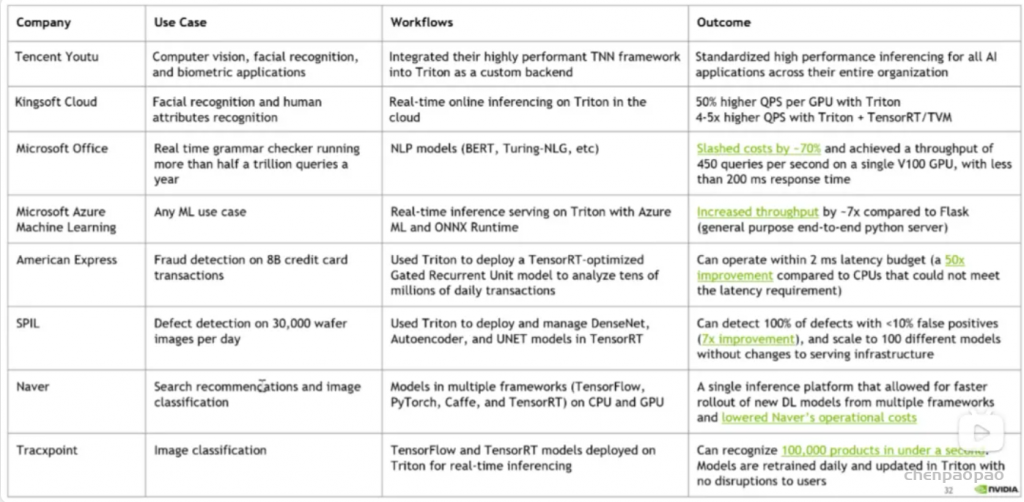
- 很多公司都在用triton,真的很多,不管是互联网大厂还是NVIDIA的竞品都在用,用户多代表啥不用我多说了吧
如何学习triton
两年前开始学习的时候,官方资料比较匮乏, 只能通过看源码来熟悉triton的使用方式,所幸知乎上有个关于TensorRT serving不错的教程[2],跟着看了几篇大致了解了triton的框架结构。那会triton叫做TensorRT serving,专门针对TensorRT设计的服务器框架,后来才变为triton,支持其他推理后端的。
现在triton的教程比较多了,官方的docs写着比较详细,还有issue中各种用例可以参考,B站上也有视频教程[3],比两年前的生态要好了不少。
当然,最重要的,还是上手使用,然后看源码, 然后客制化。
源码学习
从triton的源码中可以学到:
- C++各种高级语法
- 设计模式
- 不同backend(libtorch、TensorRT、onnxruntime等)如何正确创建推理端,如何多线程推理
- C++多线程编程/互斥/队列
- API接口暴露/SDK设计
- CMAKE高级用法
等等等等,不列举了,对于程序员来说,好的源码就是好的学习资料。当然,也可以看老潘的文章哈。
triton系列教程计划
triton相关系列也会写一些文章,目前大概规划是这些:
- 什么是triton以及triton入门、triton编译、triton运行
- triton管理模型、调度模型的方式
- triton的backend介绍、自定义backend
- 自定义客户端,python和c++
- 高级特性、优先级、rate limiter等等
编译和安装
一般来说,如果想快速使用triton,直接使用官方的镜像[4]最快。但是官方镜像有个尴尬点,那就是编译好的镜像需要的环境一般都是最新的,和你的不一定一致。
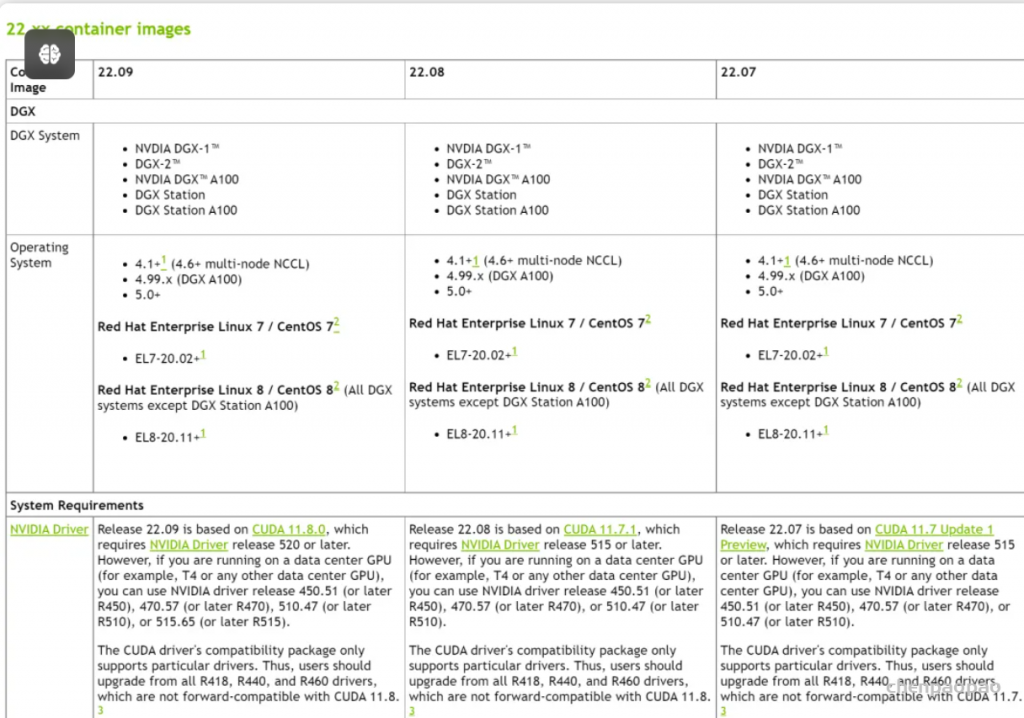
比如22.09版本的镜像需要的显卡驱动为520及以上,如果想满足自己的显卡驱动,就需要自行编译了。官方也提供了使用镜像的快速使用方法:
# 第一步,创建 model repository
git clone -b r22.09 https://github.com/triton-inference-server/server.git
cd server/docs/examples
./fetch_models.sh

# 第二步,从 NGC Triton container 中拉取最新的镜像并启动
docker run --gpus=1 --rm --net=host -v ${PWD}/model_repository:/models nvcr.io/nvidia/tritonserver:22.09-py3 tritonserver --model-repository=/models

# 第三步,发送
# In a separate console, launch the image_client example from the NGC Triton SDK container
docker run -it --rm --net=host nvcr.io/nvidia/tritonserver:22.09-py3-sdk
/workspace/install/bin/image_client -m densenet_onnx -c 3 -s INCEPTION /workspace/images/mug.jpg

# Inference should return the following
Image '/workspace/images/mug.jpg':
    15.346230 (504) = COFFEE MUG
    13.224326 (968) = CUP
    10.422965 (505) = COFFEEPOT
triton官方仓库
两年前的triton只有一个大仓库,tensorrt_backend也默认在triton主仓库中,但是现在tensorrt_backend被拆分出来了,很显然triton除了支持tensorrt还支持很多其他的后端,我们可以自定义使用很多后端。
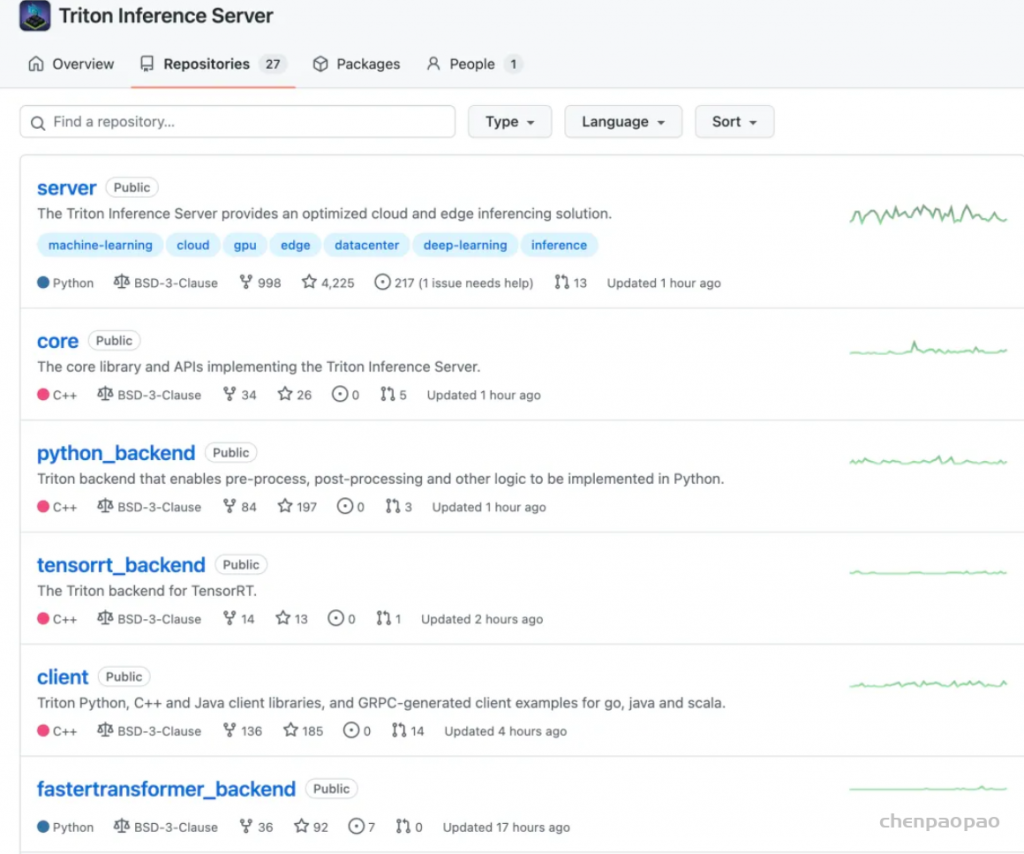
现在是目前的triton包含的一些仓库:
- [server[5]] triton服务外层框架,包含了http收发请求,服务内存分配等一些功能代码
- [core[6]] triton主框架,如果处理请求、后端管理、模型调度啥的全在这里
- [common[7]] 通用工具,没啥好说的,打日志的代码在这里
- [backend[8]] backend后端框架代码,存放了一些后端通用父类,自定义后端可以集成这些类仿写新的后端
- [third_party[9]] triton使用的第三方库的汇总,主要是cmake里头会包含
- [tensorrt_backend[10]] tensorrt后端代码
- [pytorch_backend[11]] libtorch后端代码
最开始的时候,server、core、common、backend这些代码仓库都是合在一起的,后来都拆分出来了,增加了triton的灵活性。
比如,上述的core仓库可以单独暴露出cAPI作为动态链接库供其他程序调用,去掉http、grpc的外层请求接口,直接一步到位调用。
一般来说,我们都是从最主要的server开始编,编译的时候会链接core、common、backend中的代码,其他自定义backend(比如tensorrt_backend)在编译的时候也需要带上common、core、backend这三个仓库,这些关系我们可以从相应的CMakeList中找到。
自行编译
如果想要研究源码,修改源码实现客制化,那么自行编译是必须的。
triton的编译和安装其实很简单,唯一的难点就是需要加速,因为triton在编译的时候会clone很多第三方库,第三方库也会克隆它们需要的第三方库,这些库当然都是国外的,所以有个好的网络环境很重要。
比如在编译triton的时候需要下载grpc这个库,grpc又依赖很多第三方其他库,网络不好的话,会经常遇到下面的问题:
Failed to recurse into submodule path 'third_party/bloaty'
CMake Error at /tmp/tritonbuild/tritonserver/build/_deps/repo-third-party-build/grpc-repo/tmp/grpc-repo-gitclone.cmake:52 (message):
  Failed to update submodules in:
  '/tmp/tritonbuild/tritonserver/build/_deps/repo-third-party-build/grpc-repo/src/grpc'


make[3]: *** [_deps/repo-third-party-build/CMakeFiles/grpc-repo.dir/build.make:99: _deps/repo-third-party-build/grpc-repo/src/grpc-repo-stamp/grpc-repo-download] Error 1
make[3]: Leaving directory '/tmp/tritonbuild/tritonserver/build'
make[2]: *** [CMakeFiles/Makefile2:590: _deps/repo-third-party-build/CMakeFiles/grpc-repo.dir/all] Error 2
make[2]: Leaving directory '/tmp/tritonbuild/tritonserver/build'
make[1]: *** [CMakeFiles/Makefile2:145: CMakeFiles/server.dir/rule] Error 2
make[1]: Leaving directory '/tmp/tritonbuild/tritonserver/build'
开加速是最好的办法,不管是UI还是命令行,都有相应的软件可以用,比如clash。
如果你的服务器实在是开不了加速,也有其他办法,那就是将triton库中大部分重量级库的git地址全换为国内的。
怎么替换,我是在gitee中,同步github上的仓库,比如triton的core仓库,同步过来,就可以使用国内的地址了。
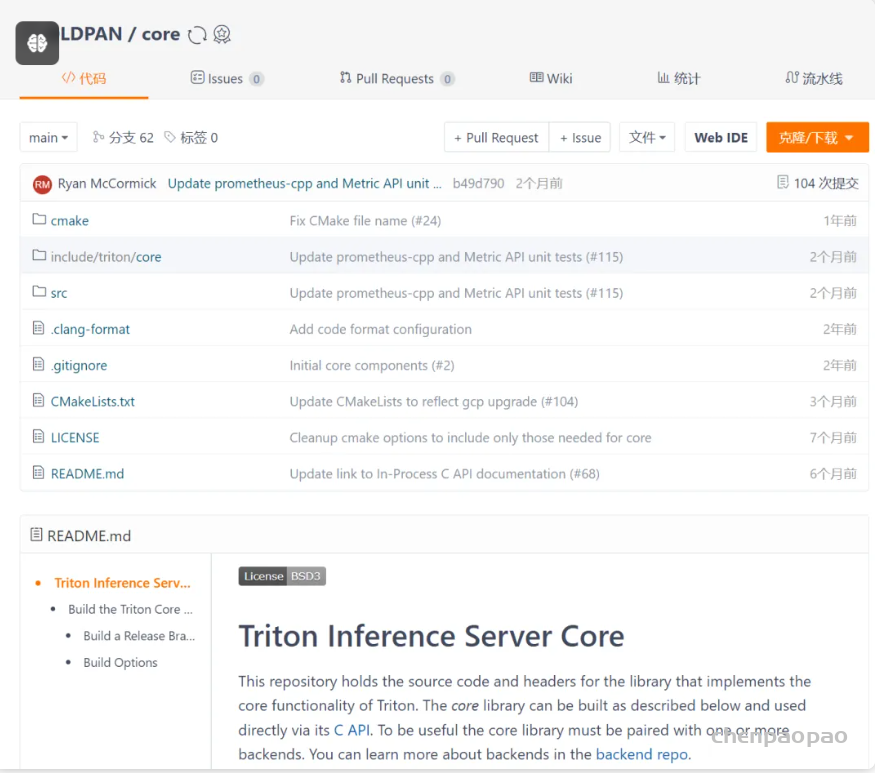
当然也需要将这些库的submodule中的库也修改为国内源,比如grpc这个库依赖很多第三方库,克隆的时候,这是要一个一个下载的:
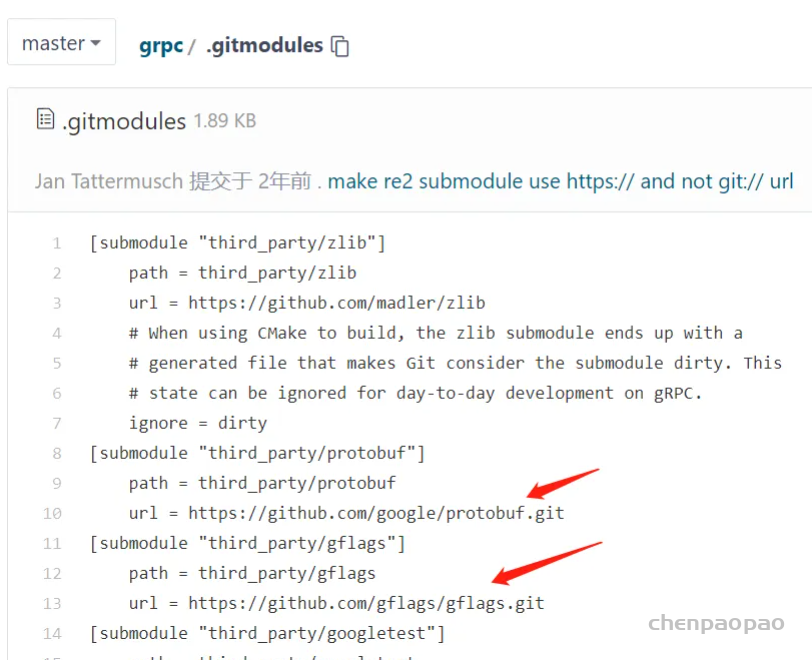
改起来稍微麻烦,还需要注意,要改特定commit分支的git地址:
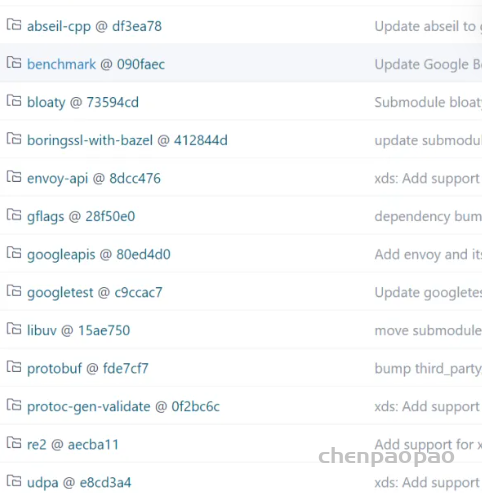
ver/build/_deps/repo-third-party-build/grpc-repo/src/grpc/third_part目录然后手动git clone xxx,然后执行一下git submodule init / git submodule update下就可以带进去。
示例:
root@64da25af2629:/tmp/tritonbuild/tritonserver/build/_deps/repo-third-party-build/grpc-repo/src/grpc# git submodule init
root@64da25af2629:/tmp/tritonbuild/tritonserver/build/_deps/repo-third-party-build/grpc-repo/src/grpc# git submodule update
Submodule path 'third_party/googletest': checked out 'c9ccac7cb7345901884aabf5d1a786cfa6e2f397'
太麻烦了,不过确实为一种办法呃呃。
还有一点,triton每次build都会clone,是因为其用了cmake中的ExternalProject_Add指令,假如我们已经有下载好的grpc,那么直接替换到server/build/_deps/repo-third-party-build/grpc-repo/src中然后将/data/oldpan/software/server/build/_deps/repo-third-party-src/CMakeLists.txt:
注释掉git下载部分,修改自己本地的就行,就不需要每次再clone一遍了。
#
# Get the protobuf and grpc source used for the GRPC endpoint. We must
# use v1.25.0 because later GRPC has significant performance
# regressions (e.g. resnet50 bs128).
#
ExternalProject_Add(grpc-repo
  PREFIX grpc-repo
  # GIT_REPOSITORY "https://gitee.com/Oldpann/grpc.git"
  # GIT_TAG "v1.25.x"
  SOURCE_DIR "${CMAKE_CURRENT_BINARY_DIR}/grpc-repo/src/grpc"
  CONFIGURE_COMMAND ""
  BUILD_COMMAND ""
  INSTALL_COMMAND ""
  TEST_COMMAND ""
  PATCH_COMMAND python3 ${CMAKE_CURRENT_SOURCE_DIR}/tools/install_src.py --src <SOURCE_DIR> ${INSTALL_SRC_DEST_ARG} --dest-basename=grpc_1.25.0
)说了这么多,总之,最好的办法当然还是开科学,全局一下就OK,省去那么多麻烦事儿。
搞定好网络问题,编译triton就很简单了!
git clone --recursive https://github.com/triton-inference-server/server.git
cd server
python build.py  --enable-logging --enable-stats --enable-tracing --enable-gpu  --endpoint=http --repo-tag=common:r22.06 --repo-tag=core:r22.06 --repo-tag=backend:r22.06 --repo-tag=thirdparty:r22.06 --backend=ensemble --backend=tensorrt
在克隆好的server的目录下执行以上命令(下面是我的设置,我们可以个根据自己的需求进行修改)就可以了。
执行这个命令后triton就会构建docker在docker中编译,最终会创建3个镜像:
- tritonserver:latest
- tritonserver_buildbase:latest
- tritonserver_cibase:latest
最终编译好的tritonserver_buildbase:latest镜像,我们可以在其中开发,因为环境都帮忙配好了,只需要再执行编译命令,就可以编译了,我们也可以自定义源码进行个性功能的开发。
在镜像中开发
需要注意,在编译的时候需要pull官方默认的镜像,而这个镜像是有显卡驱动限制的,比如r22.06需要显卡驱动版本为470。
同志们看看自己的显卡驱动,别下了不能用hhh
可以通过triton镜像历史[12]查看镜像版本要求:

接上,我们不是编译好了triton镜像,直接进去就可以开发了:
docker run -v/home/oldpan/code:/code -v/home/oldpan/software:/software -d tritonserver_buildbase:latest /usr/bin/sh -c "while true; do echo hello world; sleep 20;done"在docker中修改triton的源码,继续执行以下命令就可以编译,和之前的区别就是加了 --no-container-build参数。
python build.py --enable-logging --enable-stats --enable-tracing --enable-gpu --endpoint=http --repo-tag=common:r22.06 --repo-tag=core:r22.06 --repo-tag=backend:r22.06 --repo-tag=thirdparty:r22.06 --backend=ensemble --no-container-build --build-dir=./build我们如果想编译debug版本的triton,可以在命令中添加:--build-type=Debug。
另外,原始triton镜像中已经有tensorrt,如果想换版本,可以删除原始docker中的旧的tensorrt,自行安装新的tensorrt即可:
- https://docs.nvidia.com/deeplearning/tensorrt/install-guide/index.html[13]
说下运行流程吧!
讲了这么多铺垫,接下来简单说下运行流程。
这里通过代码简单梳理下triton运行的整体流程,之后的具体细节,放到接下来的篇章讲解。
首先一开始,main函数在servers/main.cc下,triton在启动的时候会执行以下函数:
// src/servers/main.cc 经过简化
int
main(int argc, char** argv)
{
  // 解析参数
  TRITONSERVER_ServerOptions* server_options = nullptr;
  if (!Parse(&server_options, argc, argv)) {
    exit(1);
  }
  ...
  // 这里创建server
  TRITONSERVER_Server* server_ptr = nullptr;
  FAIL_IF_ERR(
      TRITONSERVER_ServerNew(&server_ptr, server_options), "creating server"); // 这里创建server
  FAIL_IF_ERR(
      TRITONSERVER_ServerOptionsDelete(server_options),
      "deleting server options");
  std::shared_ptr<TRITONSERVER_Server> server(
      server_ptr, TRITONSERVER_ServerDelete);
  ...
  // 启动HTTP, GRPC, 以及性能统计的端口
  if (!StartEndpoints(server, trace_manager, shm_manager)) {
    exit(1);
  }
  // Trap SIGINT and SIGTERM to allow server to exit gracefully
  signal(SIGINT, SignalHandler);
  signal(SIGTERM, SignalHandler);
  // 等待kill信号区关闭triton
  while (!exiting_) {
   ...
      // 做一些监控模型仓库是否变动的操作
  }
  // 优雅地关闭triton
  TRITONSERVER_Error* stop_err = TRITONSERVER_ServerStop(server_ptr);
  // 如果无法优雅地关掉,旧直接exit即可
  if (stop_err != nullptr) {
    LOG_TRITONSERVER_ERROR(stop_err, "failed to stop server");
    exit(1);
  }
  // 停止监控http、grpc
  StopEndpoints();
  ...
  return 0;
}TRITONSERVER_ServerNew这个函数中,会:
- new一个triton类
InferenceServer对象 - 根据参数设置配置一下,执行一堆Set函数
- 配置好参数后,
Init服务,这里初始化服务的状态,校验参数 - 创建各种模块,经常使用的有后端管理
TritonBackendManager以及模型仓库管理ModelRepositoryManager - 再进行一些检查、配置一些状态
在启动过程中最重要的是模型仓库,运行triton当然你要有模型,要不然你开它干嘛?
这里我使用的模型仓库目录结构如下(是一个识别姿态的hrnet,hrnet官方有很多预训练模型,转tensorrt也很简单):
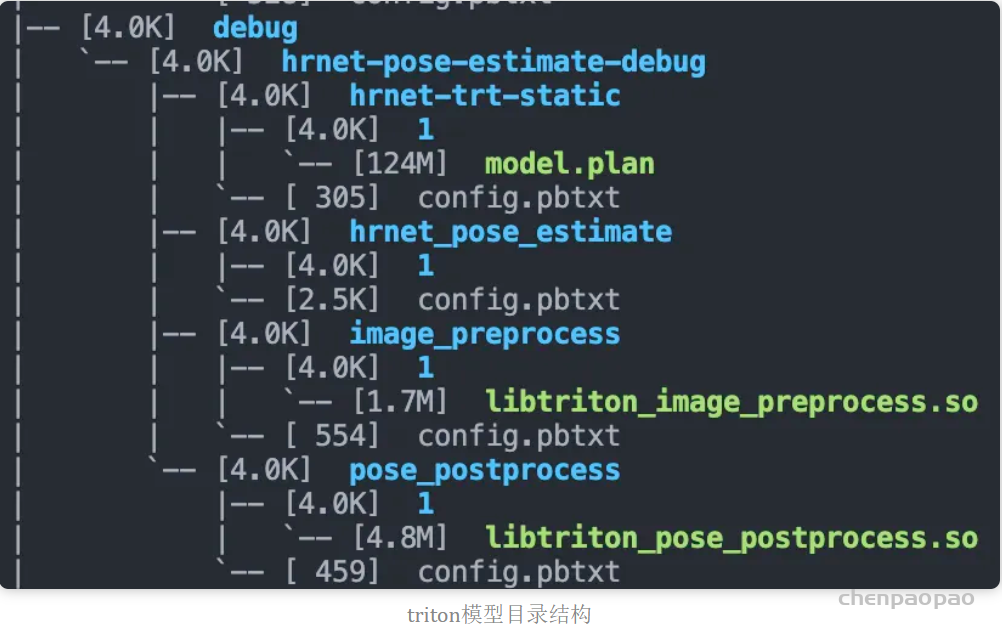
debug目录下有一个模型文件夹叫做hrnet-pose-estimate-debug的模型文件夹,这个文件夹地址(/path/to/hrnet-pose-estimate-debug)需要传给triton启动命令行,文件夹内的四个子模型文件夹,会被triton检测到并且一一加载。
需要注意的是,除了hrnet_pose_estimate这个其余三个在目录的1子目录下有个so或者model.plan,这代表hrnet-trt-static和image_preprocess还有pose_postprocess都属于model,使用了backend,backend会在各自的config中指明:
name: "hrnet-trt-static"
backend: "tensorrt"因为hrnet-trt-static是tensorrt的模型,所以backend设置为tensorrt,model.plan就是tensorrt的engine。其backend的so文件我放到了其他位置(放到和model.plan同目录也是可以的),而另外两个预处理和后处理的backend就放到了模型仓库中,也就是libtorch_image_preprocess.so和libtriton_pose_postprocess,包含了你的backend代码,封装成so供triton调用
关于backend、model以及modelinstanc的关系,说实话稍微复杂点,各自有完整的生命周期,这个嘛,之后文章说,感兴趣的也可以提前看官方文档的介绍:
- https://github.com/triton-inference-server/backend[14]
然后我们就启动triton吧!
# 执行以下函数,模型目录通过 --model-repository 指定     tensorrt的backend通过  --backend-directory 指定
./tritonserver --model-repository=/path/to/hrnet-pose-estimate-debug --backend-directory=/workspace/backends/tensorrt_backend/
模型加载成功之后会输出:
...
I1016 08:25:37.952055 51771 server.cc:587]
+------------------+----------------------------------------------------------------+----------------------------------------------------------------+
| Backend          | Path                                                           | Config                                                         |
+------------------+----------------------------------------------------------------+----------------------------------------------------------------+
| image_preprocess | /workspace/triton-models/debug/hrnet-pose-estimate-debug/image | {"cmdline":{"auto-complete-config":"false","min-compute-capabi |
|                  | _preprocess/1/libtriton_image_preprocess.so                    | lity":"6.000000","backend-directory":"/workspace/backends/tens |
|                  |                                                                | orrt_backend/","default-max-batch-size":"4"}}     |
|                  |                                                                |                                                                |
| pose_postprocess | /workspace/triton-models/debug/hrnet-pose-estimate-debug/pose_ | {"cmdline":{"auto-complete-config":"false","min-compute-capabi |
|                  | postprocess/1/libtriton_pose_postprocess.so                    | lity":"6.000000","backend-directory":"/workspace/backends/tens |
|                  |                                                                | orrt_backend/","default-max-batch-size":"4"}}     |
|                  |                                                                |                                                                |
| tensorrt         | /workspace/backends/tensorrt_backend/li              | {"cmdline":{"auto-complete-config":"false","min-compute-capabi |
|                  | btriton_tensorrt.so                                            | lity":"6.000000","backend-directory":"/workspace/backends/tens |
|                  |                                                                | orrt_backend/","default-max-batch-size":"4"}}     |
|                  |                                                                |                                                                |
+------------------+----------------------------------------------------------------+----------------------------------------------------------------+

I1016 08:25:37.952252 51771 server.cc:630]
+---------------------+---------+--------+
| Model               | Version | Status |
+---------------------+---------+--------+
| hrnet-trt-static    | 1       | READY  |
| hrnet_pose_estimate | 1       | READY  |
| image_preprocess    | 1       | READY  |
| pose_postprocess    | 1       | READY  |
+---------------------+---------+--------+

I1016 08:25:38.051742 51771 metrics.cc:650] Collecting metrics for GPU 0: NVIDIA GeForce RTX 3080
I1016 08:25:38.055197 51771 tritonserver.cc:2159]
+----------------------------------+------------------------------------------------------------------------------------------------------------------+
| Option                           | Value                                                                                                            |
+----------------------------------+------------------------------------------------------------------------------------------------------------------+
| server_id                        | triton                                                                                                           |
| server_version                   | 2.23.0                                                                                                           |
| server_extensions                | classification sequence model_repository model_repository(unload_dependents) schedule_policy model_configuration |
|                                  |  system_shared_memory cuda_shared_memory binary_tensor_data statistics trace                                     |
| model_repository_path[0]         | /workspace/triton-models/debug/hrnet-pose-estimate-debug                                                         |
| model_control_mode               | MODE_NONE                                                                                                        |
| strict_model_config              | 1                                                                                                                |
| rate_limit                       | OFF                                                                                                              |
| pinned_memory_pool_byte_size     | 268435456                                                                                                        |
| cuda_memory_pool_byte_size{0}    | 300021772                                                                                                        |
| response_cache_byte_size         | 0                                                                                                                |
| min_supported_compute_capability | 6.0                                                                                                              |
| strict_readiness                 | 1                                                                                                                |
| exit_timeout                     | 30                                                                                                               |
+----------------------------------+------------------------------------------------------------------------------------------------------------------+

I1016 08:25:38.055627 51771 http_server.cc:3303] Started HTTPService at 0.0.0.0:8000
I1016 08:25:38.097213 51771 http_server.cc:178] Started Metrics Service at 0.0.0.0:8001
加载好之后,我们开启了http端口,端口号为8000,另一个是metric接口,端口号8001
此时可以使用http请求试一下。
简单请求
请求的话有http和grpc协议,我对http协议熟悉些,所以就搞http吧。
官方也提供了客户端,C++和python的都可以有,可以直接使用官方的,也可以根据官方提供的http协议构造自己的客户端,只要会构造body,一切都很简单。
请求协议可以参考官方:
- https://github.com/kserve/kserve/blob/master/docs/predict-api/v2/required_api.md[15]
这里我们用python简单构造一个body:
# 构造triton的输入body
json_buf = b'{\"inputs\":[{\"name\":\"INPUT\",\"datatype\":\"BYTES\",\"shape\":[1],\"parameters\":{\"binary_data_size\":' + \
        bytes(str(len(data)), encoding = "utf8") + b'}}],\"outputs\":[{\"name\":\"RESULT\",\"parameters\":{\"binary_data\":true}}]}'
push_data = json_buf + data

print("Inference-Header-Content-Length ",str(len(json_buf)), " Content-Length ",str(len(data) + len(json_buf)))
# 构造triton-header
header = {"Content-Type": "application/octet-stream", "Accept": "*/*",
          "Inference-Header-Content-Length":str(len(json_buf)),
          "Content-Length":str(len(data) + len(json_buf))}

server_url = "127.0.0.1:8000"
model_name = "hrnet_pose_estimate"

# 请求
response = post('http://' + server_url + '/v2/models/' + model_name + '/infer', data=push_data, headers=header)
就可以发送请求,结果也会传回response里。我们也可以使用curl命令,直接传递构造好的body(这个body将上述的push_data写到本地即可):
[oldpan@have-fun client]$ curl -v --max-time 1 --request POST 'http://192.168.1.102:9006/v2/models/hrnet_pose_estimate/infer' --header 'Inference-Header-Content-Length: 230' --header 'Content-Type: application/octet-stream' --data-binary '@data.txt' --output temp_res
Note: Unnecessary use of -X or --request, POST is already inferred.
*   Trying 192.168.1.102:9006...
  % Total    % Received % Xferd  Average Speed   Time    Time     Time  Current
                                 Dload  Upload   Total   Spent    Left  Speed
  0     0    0     0    0     0      0      0 --:--:-- --:--:-- --:--:--     0* Connected to 172.29.210.105 (172.29.210.105) port 9006 (#0)
> POST /v2/models/aocr_cnprint_trt8p/infer HTTP/1.1
> Host: 192.168.1.102:9006
> User-Agent: curl/7.71.1
> Accept: */*
> Inference-Header-Content-Length: 230
> Content-Type: application/octet-stream
> Content-Length: 1573102
> Expect: 100-continue
>
* Mark bundle as not supporting multiuse
< HTTP/1.1 100 Continue
} [56480 bytes data]
* We are completely uploaded and fine
* Mark bundle as not supporting multiuse
< HTTP/1.1 200 OK
< Content-Type: application/json
< Inference-Header-Content-Length: 394
< Content-Length: 6794
<
{ [6794 bytes data]
100 1542k  100  6794  100 1536k   127k  28.8M --:--:-- --:--:-- --:--:-- 28.9M
结果就不发了,验证没啥问题。
关于如何使用curl直接请求triton,有一些相关链接可以参考:
- https://github.com/triton-inference-server/server/issues/2563[16]
- https://github.com/triton-inference-server/server/issues/1822[17]
参考资料
https://www.bilibili.com/video/BV1KS4y1v7zd/?spm_id_from=333.788&vd_source=eec038509607175d58cdfe2e824e8ba2[18]
https://github.com/triton-inference-server/server/releases[19]
https://docs.nvidia.com/deeplearning/triton-inference-server/release-notes/index.html[20]
https://zhuanlan.zhihu.com/p/462817679[21]
参考资料
[1]
triton: https://github.com/openai/triton

[2]
教程: https://www.zhihu.com/people/pwlazy/posts

[3]
视频教程: https://www.bilibili.com/video/BV1KS4y1v7zd/?spm_id_from=333.337.search-card.all.click&vd_source=eec038509607175d58cdfe2e824e8ba2

[4]
官方的镜像: https://docs.nvidia.com/deeplearning/triton-inference-server/release-notes/index.html

[5]
[server: https://github.com/triton-inference-server/server

[6]
[core: https://github.com/triton-inference-server/core

[7]
[common: https://github.com/triton-inference-server/common

[8]
[backend: https://github.com/triton-inference-server/backend

[9]
[third_party: https://github.com/triton-inference-server/third_party.git

[10]
[tensorrt_backend: https://github.com/triton-inference-server/tensorrt_backend

[11]
[pytorch_backend: https://github.com/triton-inference-server/pytorch_backend

[12]
triton镜像历史: https://docs.nvidia.com/deeplearning/triton-inference-server/release-notes/rel_22-06.html

[13]
https://docs.nvidia.com/deeplearning/tensorrt/install-guide/index.html: https://docs.nvidia.com/deeplearning/tensorrt/install-guide/index.html

[14]
https://github.com/triton-inference-server/backend: https://github.com/triton-inference-server/backend

[15]
https://github.com/kserve/kserve/blob/master/docs/predict-api/v2/required_api.md: https://github.com/kserve/kserve/blob/master/docs/predict-api/v2/required_api.md

[16]
https://github.com/triton-inference-server/server/issues/2563: https://github.com/triton-inference-server/server/issues/2563

[17]
https://github.com/triton-inference-server/server/issues/1822: https://github.com/triton-inference-server/server/issues/1822

[18]
https://www.bilibili.com/video/BV1KS4y1v7zd/?spm_id_from=333.788&vd_source=eec038509607175d58cdfe2e824e8ba2: https://www.bilibili.com/video/BV1KS4y1v7zd/?spm_id_from=333.788&vd_source=eec038509607175d58cdfe2e824e8ba2

[19]
https://github.com/triton-inference-server/server/releases: https://github.com/triton-inference-server/server/releases

[20]
https://docs.nvidia.com/deeplearning/triton-inference-server/release-notes/index.html: https://docs.nvidia.com/deeplearning/triton-inference-server/release-notes/index.html

[21]
https://zhuanlan.zhihu.com/p/462817679: https://zhuanlan.zhihu.com/p/462817679