
Python 使用 ctypes 调用 C/C++ DLL 动态链接库
Python ctypes模块优点与适用场景
ctypes 有以下优点:
- Python内建,不需要单独安装
- 可以直接调用二进制的动态链接库,在Python一侧,不需要了解 c/c++ dll 内部的工作方式
- 对C/C++与Python基本类型的相互映射有良好的支持。
ctypes 在下列场景可以发挥较大作用
- 运算量大的操作可以写成 C/C++ dll, python 通过 ctypes 来调用, 大幅提升Python代码性能。
- python可以直接使用 C/C++各类资源,如boost库等。
- 第3方软件或硬件提供的SDK库,通过ctypes来实现调用对接。 理论上C/C++的库都可以对接,这比其它语言方便得多。
Python本身开发效率高,还具备丰富的生态资源,有了 ctypes 加持,还可以使用C/C++的优秀资源,因此,掌握了这个工具,相信我,在大部分项目上将给你带来惊喜。
ctypes 官方文档,更着重是一份产品说明书,而不是教程,阅读官方文档来学习比较耗精力。 本人旨在给提供一份优秀教程,尽可能有条理地讲清楚原理、通过实例代码演示如何使用,同时也涉及一些更复杂的使用场景,如回调函数等。
除了ctypes 外,还可以通过 python C API、Cython来编写C/C++代码模块,或者利用第3方工具包来完成融合,如
Swig
pybind11
1、Visual Studio 2022 把项目打包成DLL
在示例讲解之前,我们先用Visual Studio2022创建并编译1个DLL项目
1) 创建新项目, 选择dll项目
至此创建完成,包含源文件dllmain.cpp、pch.cpp,头文件framework.h、pch.h。 ![在这里插入图片描述]
2) 定义头文件 boFirst.h
#define IMPORT_DLL __declspec(dllimport) 定义了IMPORT_DLL 宏, __declspec(dllimport)表示函数将被编译为dll
extern "C" IMPORT_DLL  ==》 指定该函数可被外部调用。
#pragma once

#ifdef DLL_EXPORT
#define IMPORT_DLL __declspec(dllexport)
#else
#define IMPORT_DLL __declspec(dllimport)
#endif

//自定义结构体
struct boShape
{
    char  shape[20];
    float width;
    float height;
    float depth;
};

// 自定义函数
extern "C" IMPORT_DLL int bo_add(int a, int b);
//自定义函数,参数为结构体 boStruct
extern "C" IMPORT_DLL float bo_shape_vol(boShape bs);
这里分别添加bo_add, bo_shape_vol 两个可供外部调用函数声明, 也可以更简化,只要函数前面有extern “C” __declspec(dllexport) 即可。
#ifndef _PY_LIST_2_C_ARRAY_H_
#define _PY_LIST_2_C_ARRAY_H_

#include <stdio.h>

typedef struct {
    int value;
    wchar_t* name;
} Item;

extern "C" __declspec(dllexport)
int sum_diagonal(Item** field, size_t size);

#endif
3)实现函数代码
// boFirst.cpp : Defines the exported functions for the DLL.
#include "pch.h" // use stdafx.h in Visual Studio 2017 and earlier
#include <utility>
#include <limits.h>
#include "boFirst.h"
# include <iostream>

int bo_add(int a, int b)
{
    int c;
    c = a + b;
    return c;
}

float bo_shape_vol(boShape bs)
{
    float volume = bs.width * bs.height * bs.depth;
    std::cout << bs.shape << "volume is " << volume << std::endl;
    return volume;
}
4) 编译生成dll
选择build solution , 输出窗口可以看到,在x64\Debug\ 目录下生成了DLL_Test.dll 文件
Rebuild started...
1>------ Rebuild All started: Project: DLL_Test, Configuration: Debug x64 ------
1>pch.cpp
1>dllmain.cpp
1>boFirst.cpp
1>D:\workplace\temp\C++\DLL_Test\DLL_Test\boFirst.cpp(8,5): warning C4273: 'bo_add': inconsistent dll linkage
1>D:\workplace\temp\C++\DLL_Test\DLL_Test\boFirst.h(20,27): message : see previous definition of 'bo_add'
1>D:\workplace\temp\C++\DLL_Test\DLL_Test\boFirst.cpp(15,7): warning C4273: 'bo_shape_vol': inconsistent dll linkage
1>D:\workplace\temp\C++\DLL_Test\DLL_Test\boFirst.h(22,29): message : see previous definition of 'bo_shape_vol'
1>Generating Code...
1>   Creating library D:\workplace\temp\C++\DLL_Test\x64\Debug\DLL_Test.lib and object D:\workplace\temp\C++\DLL_Test\x64\Debug\DLL_Test.exp
1>DLL_Test.vcxproj -> D:\workplace\temp\C++\DLL_Test\x64\Debug\DLL_Test.dll
1>Done building project "DLL_Test.vcxproj".
========== Rebuild All: 1 succeeded, 0 failed, 0 skipped ==========
2、通过 ctypes 调用DLL的简单示例
在上一节中的dll有两个方法,其中1个输入参数使用了C++ Struct 结构体, python没有对应的数据结构。
第1种调用方式 (标准方式):
Step-1:
将DLL_Test.dll 文件拷贝至python文件所在目录, 该dll中包含如下可供调用的函数
int bo_add(int a, int b)
float bo_shape_vol(boShape bs); 其中boShape为自定义struct
Step-2:
编写代码,调用 bo_add()方法
from ctypes import *
dll = cdll.LoadLibrary("./DLL_Test.dll")
print("bo_add ", dll.bo_add(20, 80))
运行,即可以得到输出 100
cdll.LoadLibrary() 方法返回 cdll 对象,cdll 调用C/C++函数的方法遵从 cdecl 方式(C/C++函数调用的标准方式)。
上例是直接调用 dll中的函数.
第2种调用方式( 函数签名方式)
函数签名方式,相当于在python内重新申明1个C++函数的别名,申明内容包括用ctype指定函数形参与返回值的数据类型。
import ctypes
clibrary = ctypes.CDLL('clibrary.so')

# 定义1个python函数名,指向 C++ 函数
addTwoNumbers = clibrary.add

# 用ctypes 数据类型,定义函数的参数类与返回值类型,
addTwoNumbers.argtypes = [ctypes.c_int, ctypes.c_int]
addTwoNumbers.restype = ctypes.c_int

# 使用签名函数
print("Sum of two numbers is :", addTwoNumbers(20, 10))
Output: Sum of two numbers is : 30
ctypes 数据类型 –> Python 数据类型的转换是程序在后台自动完成的。
3、ctypes 数据类型
C/C++的数据类型与 Python数据类型及使用方式都有较多差异,因此python调用C++函数,必须需要对DLL函数形参以及返回值类型进行转换,才能把数据传入DLL,以及解析DLL的返回值。ctypes 模块提供了中间数据类型,来帮助Python完成数据转换,这些类型在python中都是以对象方式出现。
Python 调用DLL函数分3步:
1) 在Python中重新申明 DLL 函数: 除了函数名之外,还要用ctypes的数据类型将 DLL 函数的形参与返回值重新申明一遍。
2) 实参准备:当实际调用该函数时,将数据赋值给ctypes参数后,调用该函数。
3) 解析返回值:如果有返回值,从 ctypes 类型中解析出数据。
其中,第1步,用ctypes 类型申明 DLL函数形参最为关键,可以认为这一步目的是将 C++的数据类型转换为Python数据类型,ctypes 起到桥梁作用。
下面介绍一下 ctypes 提供了哪些数据类型,以及如何使用。
1) ctypes 与c、python数据类型的对应关系
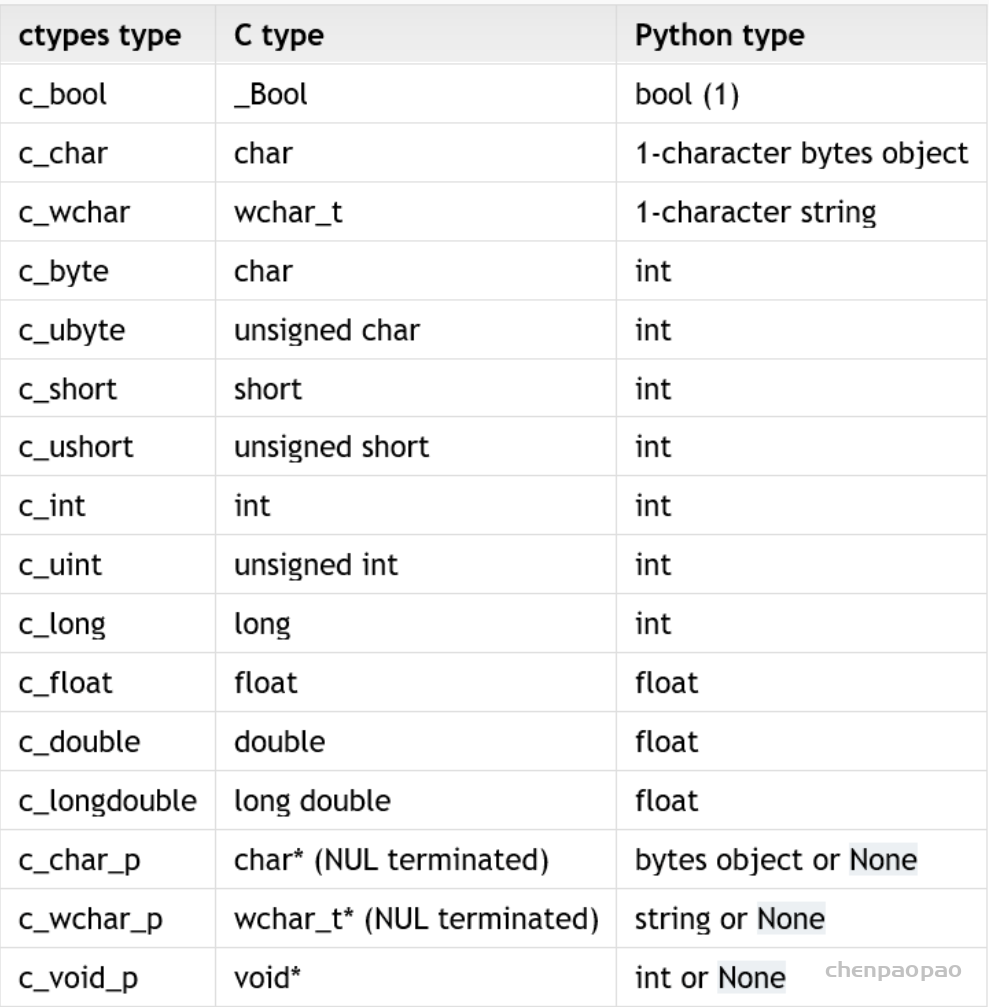
2) 整数型参数变量定义
i = c_int()
赋值 :
i = c_int(99)
i.value=99
print(i)
c_long(99)
3) 浮点数值参数
d1 = c_float()
d1.value=10.3
d1
c_float(10.300000190734863)
>>> d1.value
10.300000190734863
4) 字符串参数
用 char * 32 定义1个32个字符的字符串,赋值用 value属性
>>> str1 = c_char * 32
>>> str1
<class '__main__.c_char_Array_32'>
>>> str1.value = b"hello"
>>> str1
<class '__main__.c_char_Array_32'>
>>> str1.value
b'hello'
C/C++中字符串是用char* 指针或数组来代替,ctypes 提供对应的字符串指针类型 c_char_p,给c_char_p赋值通常有两种方式: – 把 python 字符串转为 bytes 类型, 使用endcode()方法。 – 直接使用bytes 类型字节串。
将字符串转换为 bytes 对象后,用c_char_p的value属性赋值, 用法示例 str2.value = x 赋值。
>>> x = b"abcdef"
>>> str2 = c_char_p()
>>> str2.value = x
>>> str2
c_char_p(140250436808304)
>>> str2.value
b'abcdef'
>>> str2 = str1
>>> str2
<class '__main__.c_char_Array_32'>
>>> str2.value
b'hello'
c_char_p 指向的数据类型必须是二进制编码,即Bytes类型,如果是中文,可以用utf-8编码,显示时再解码.
>>> y=bytes("hello, 小王","utf-8")
>>> str2.value=y
>>> str2.value
b'hello, \xe5\xb0\x8f\xe7\x8e\x8b'
>>> str2.value.decode(encoding="utf-8")
'hello, 小王'
ctypes 还提供了 create_string_buffer() 方法用于生成字符串。 格式: ctypes.create_string_buffer(init_or_size, size=None)
str3 = create_string_buffer(b’world’,32)
print(str3)
<main.c_char_Array_32 object at 0x7f8e9826eac0>
print(str3.value)
b’world’
print(str3.raw)
b’\x00\x00\x00\x00\x00\x00\x00\x00\x00\x00\x00\x00\x00\x00\x00\x00\x00\x00\x00\x00\x00\x00\x00\x00\x00\x00\x00\x00\x00\x00\x00\x00′ repr(str3.raw)
create a 3 byte buffer, initialized to NUL bytes
p = create_string_buffer(3)create a buffer containing a NUL terminated string
p = create_string_buffer(b'Hello')
print(sizeof(p)
repr(p.raw))
create a 10 byte buffer
p = create_string_buffer(b'Hello', 10) print(sizeof(p), repr(p.raw))5) 数组类型变量
数组的创建和C/C++语言的类似,给定数据类型和长度即可
如定义 c_int 类型数组, 长度为10. 先定义1个 INT_ARRAY 类型,再创建1个数组变量,其类型为 c_long_Array_10, 示例代码:
>>> INT_ARRAY = c_int * 10
>>> array1 = INT_ARRAY(10,20,30,40,50,60,70,80,90,100)
>>> array1
<__main__.c_long_Array_10 object at 0x00000283665D7040>
>>> array1[5]
60
>>> array1[7:]
[80, 90, 100]
创建数据变量过程可以将两步并为1步,
>>> array2 = (c_int * 10)(10,20,30,40,50,60,70,80,90,100)
>>> array2
<__main__.c_long_Array_10 object at 0x0000028366558B40>
>>> array2[7:]
[80, 90, 100]
6) Structure 变量
Python的dict类型虽然与C/C++ struct 结构体类型很相似,但不能直接拿来用。ctypes模块提供了 Structure 类来进行 C/C++ struct结构体类型转换。 示例,定义1个POINT 像素点结构体
class POINT(Structure):
...     _fields_ = [("x", c_int),
...                 ("y", c_int)]
>>> point = POINT(10, 20)
>>> print(point.x, point.y)
10 20
定义1个RECT 结构体,其字段为POINT结构体
>>> class RECT(Structure):
...     _fields_ = [("upperleft", POINT),
...                 ("lowerright", POINT)]
...
>>> rc = RECT(point)
>>> print(rc.upperleft.x, rc.upperleft.y)
0 5
>>> print(rc.lowerright.x, rc.lowerright.y)
0 0
>>>r = RECT(POINT(1, 2), POINT(3, 4))
1个更复杂的结构体, 字段 b , 为浮点数, “point_arrary” 为1个包含POINT结构体类型的Array
>>> class MyStruct(Structure):
...     _fields_ = [("a", c_int),
...                 ("b", c_float),
...                 ("point_array", POINT * 4)]
说明: python3 新增了struct 模块,基于序列化的原理,可将不同类型的数据打包进 ctypes bytes buffer变量,用于向c/c++ struct 变量传值, 但直观度不如 Structure变量,有兴趣者可以深入了解一下 python struct 模块的使用
7) 指针变量
ctypes提供了pointer()和POINTER()两种方法创建指针
pointer( object )用于将某个类型的对象转化为指针
其参数必须是ctypes的变量对象,不能是类型. 如下例,int_p 指向1个c_int 对象的指针,当前值为99
int_obj = c_int(99)
int_p = pointer(int_obj)
print(int_p)
使用contents方法访问指针
print(int_p.contents)
# 获取指针指向的值
print(int_p[0])
output 如下
<ctypes.wintypes.LP_c_long object at 0x00000217897102C0>
c_long(99)
99
POINTER()用于定义指针变量类型
POINTER() 的参数必须是类型名称,相当于定义了新的1个指针变量类型,但指向值的类型必须是指定的类型名称。然后再用这个新类型实例化1个指针变量。 而 pointer() 方法隐式地完成了POINTER()的工作。
# 指针类型
INT_P  = POINTER(c_int)  # 定义了1个新的指针变量类型
# 实例化
int_obj = c_int(4)
int_p_obj = INT_P(int_obj)   # 实例化1个指针变量
print(int_p_obj)
print(int_p_obj.contents)
print(int_p_obj[0])
output :
<__main__.LP_c_int object at 0x7f47df7f79e0>
c_int(4)
4
指针类型的转换
ctypes提供 cast() 方法将一个ctypes实例转换为指向另一个ctypes数据类型的指针,cast()接受两个参数,一个是ctypes对象,它是或可以转换成某种类型的指针,另一个是ctypes指针类型。它返回第二个参数的一个实例,该实例引用与第一个参数相同的内存块。
# 初始化 1个 c_int的指针,当前值为4
int_p = pointer(c_int(99))
print(int_p)
# 定义1个 c_char类型的指针类型
char_p_type = POINTER(c_char)
print(char_p_type)
# 转 c_int变量转换为c_char类型指针
cast_type = cast(int_p, char_p_type)
print(cast_type)
output:
<ctypes.wintypes.LP_c_long object at 0x0000021789710140>
<class 'ctypes.LP_c_char'>
<ctypes.LP_c_char object at 0x0000021789710E40>
8) enum 枚举类型
在 C/C++中还有1个经常用到的类型是 enum,ctypes 没有相关类型,但python有1个enum类. 下面介绍如何 将 python enum 类用于 dll 函数参数。 如 C++程序中定义了1个枚举类型
enum Priority {
        CRITICAL = 0x1,
        IMPORTANT= 0x2,
        NORMAL = 0x3,
        MINOR = 0x4,
        INFO = 0x5
    };
有1个函数: long set_priority(Priority n) 在python中,也定义1个enum类
import enum
class EnumPriority(enum.IntEnum):
    CRITICAL = 0x1
    IMPORTANT= 0x2
    NORMAL = 0x3
    MINOR = 0x4
    INFO = 0x5

    #注意必须将添加这个方法,ctyps 要求,将obj转为 init型
    @classmethod
    def from_param(cls, obj):
        return int(obj)
注意,必须要添加1个 from_param()方法., 将上面的枚举元素转为int型 下面将 python enum 做为参数传入dll
dll =  cdll.LoadLibrary(dll_name)
set_priority=dll.set_priority
set_priority.restype = c_init
set_priority.argtypes = [EnumPriority]
# 调用该函数
print("call back result is ",set_priority(EnumPriority.INFO))
4. 加载DLL库
Ctypes 提供有2种动态链接库的调用方式
ctypes.cdll. LoadLibrary(‘xxx.dll’) 加载 cdel调用方式的dll, 默认c++, vc++生成的dll库都是cdel方式。
ctypes.windll.LoadLibrary(‘xxx.dll’) 加载 win32调用方式(stdcall)的dll,所以很少使用此种调用方式
示例
def find_example_ctypes(required):
    '''
    Finds and loads example shared object of the required major
    '''
    # Importing ``ctypes`` should be in scope of this function to prevent failure
    from ctypes import util, cdll

    so_name = util.find_library('example.dll')
    if so_name is None:
        raise ExampleImportError('EXAMPLE shared object not found.')
    example = cdll.LoadLibrary(so_name)
    require_version(example.example_version(), required)
    return example
5. ctypes 向DLL函数传入参数
指定dll函数参数类型 通过argtypes属性来设置参数类型,
>>> strchr.restype = c_char_p
>>> strchr.argtypes = [c_char_p, c_char]
例2:
myadd = dll.bo_add
myadd.restype = c_int
myadd.argtypes = [c_int, c_int]
print("call bo_add() with function signature approach \n", myadd(20, 80))
传入指针参数 c++ 函数addx()的形参为两个指针, int addx( int p1, int p2), python 实例两个c_int型的指针传入
int_obj1 = c_int(20)
ptr1 = pointer(int_obj1)
int_obj2 = c_int(80)
ptr2 = pointer(int_obj2)
print("pass pointer to function addx(), ", dll.addx(ptr1, ptr2))
传入结构体参数
步骤: – 在python定义1个Ctypes.Structure 类, 字段也C++ Struct类型保持一致。 – 用此类构建参数值 – 传入dll函数,前面要加byref 示例 :
from ctypes import *

class MyStruct(Structure):
    _fields_ = [('shape', c_char*20),
                ('w', c_double),
                ('h', c_double),
                ('d', c_double),
                ]
第2种调用方式
myadd = dll.bo_add
myadd.restype = c_int
myadd.argtypes = [c_int, c_int]
print("another call method to bo_add() : ", myadd(20, 80))
传入结构体参数
dw, dh, dd = 4.0, 7.0, 3.0
dstr = b"cuboid "
s1 = MyStruct(dstr, dw, dh, dd)
print(s1.w, s1.h, s1.d)
print(s1.shape)
print(dll.bo_shape_vol(byref(s1)))
Output 4.0 7.0 3.0 b’cuboid ‘ cuboid volume is 84 233390192
问题: print(dll.bo_shape_vol(byref(s1))) 打印出的是地址,不是结果 84 解决办法:用类的调用方式,定义dll函数返回值类型
print("第2种调用方法")
myVol = dll.bo_shape_vol
myVol.restype = c_double  #定义dll函数返回值类型
myVol.argtypes = [POINTER(MyStruct)]  #结构体参数是以地址方式传入,因此要转为指针
dx = myVol(byref(s1))
print(dx)
Output
第2种调用方法
cuboid volume is 84
84.0
下面是另1个例 子
from ctypes import *

class Passport(Structure):
    _fields_ = [("name", c_char_p),
                ("surname", c_char_p),
                ("var", c_int)]

lib_dll = cdll.LoadLibrary("DLL_example.dll")
lib_dll.SetPassport.argtypes  = [POINTER(Passport)]

lib_dll.GetPassport()

lib_dll.SetName(c_char_p(b"Yury"))
lib_dll.SetSurname(c_char_p(b"Wang"))

lib_dll.GetPassport()

name = str.encode(("Feng"))
surname = c_char_p((b'Li'))

passport = Passport(name, surname, 34)

lib_dll.SetPassport(pointer(passport))

lib_dll.GetPassport()
Output:
Load DLL in Python
SetName
SetSurname
GetPassport: Default | Passport | 17
SetName
SetSurname
GetPassport: Yury | Orlov | 17
SetPassport
GetPassport: Vasiliy | Pupkin | 34
DETACH DLL
6. 对回调函数的支持
C++中,用函数指针非常容易地实现回调函数,python也可以实现。 第1步: 用 CFUNCTYPE() 定义1个函数指针,windows 使用 WINFUNCTYPE() 。 CFUNCTYPE()第1个参数是回调函数返回值类型,后面是函数形参。 第2步:将回调函数名赋给CFUNCTYPE变量,相当于将函数地址赋给函数指针。 第3步:将该回调函数指针做为另1个函数的形参使用。
示例如下:
from ctypes import *
import sys

# 回调函数类型定义
if 'linux' in sys.platform:
    fun_ctype = CFUNCTYPE
else:
    fun_ctype = WINFUNCTYPE

def add(int a,int b):
    return a+b

ADDFUNC = fun_ctype(c_int, c_int, c_int)
add_callback = ADDFUNC(add)
#将CFUNCTYPE变量做为函数形参
def test(x,y,ADDFUNC):
    print(f"data is {x} and {y}
    return add_callback(x,y)

#实际测试时,把回调函数做为参数传入
test(10,20,add_callback)
总结:
1) ctypes 对c/c++ dll/so中的函数与形参,需要先申明才能使用
2)ctypes 提供了一套数据类型,用于C 数据类型与 python 数据类型的转换, 注意数组,指针类型的转换。
3) ctypes 调用 c/c++ dll/so 动态链接库函数的方法有两种
- 函数名直接调用
- 签名函数的方式调用