
github: https://github.com/HRNet/HRNet-Semantic-Segmentation
Paper: https://arxiv.org/abs/1908.07919
High-Resoultion Net(HRNet)由微软亚洲研究院和中科大提出,发表在CVPR2019
摘要:高分辨率表示对于位置敏感的视觉问题十分重要,比如目标检测、语义分割、姿态估计。为了这些任务位置信息更加精准,很容易想到的做法就是维持高分辨率的feature map,事实上HRNet之前几乎所有的网络都是这么做的,通过下采样得到强语义信息,然后再上采样恢复高分辨率恢复位置信息(如下图所示),然而这种做法,会导致大量的有效信息在不断的上下采样过程中丢失。而HRNet通过并行多个分辨率的分支,加上不断进行不同分支之间的信息交互,同时达到强语义信息和精准位置信息的目的。
模型的主要特点是在整个过程中特征图(Feature Map)始终保持高分辨率,这与之前主流方法思路上有很大的不同。在HRNet之前,2D人体姿态估计算法是采用(Hourglass/CPN/Simple Baseline/MSPN等)将高分辨率特征图下采样至低分辨率,再从低分辨率特征图恢复至高分辨率的思路(单次或重复多次),以此过程实现了多尺度特征提取的一个过程。
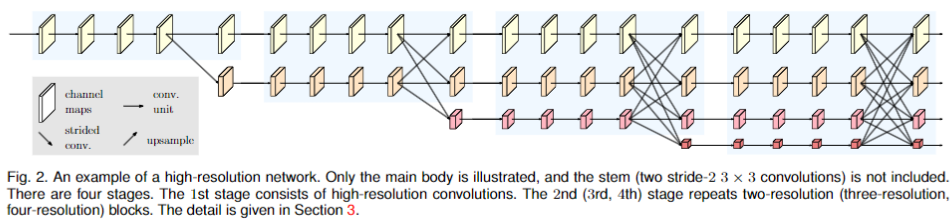
HRNet在整个过程中保持特征图的高分辨率,但多尺度特征提取是姿态估计模型一定要实现的过程,那么HRNet是如何实现多尺度特征提取的呢?模型是通过在高分辨率特征图主网络逐渐并行加入低分辨率特征图子网络,不同网络实现多尺度融合与特征提取实现的。
特点与优势:
(1)作者提出的方法是并行连接高分辨率与低分辨率网络,而不是像之前方法那样串行连接。因此,其方法能够保持高分辨率,而不是通过一个低到高的过程恢复分辨率,因此预测的heatmap可能在空间上更精确。
(2)本文提出的模型融合相同深度和相似级别的低分辨率特征图来提高高分辨率的特征图的表示效果,并进行重复的多尺度融合。
缺点:因为特征图分辨率过大,而且数量多,这样肯定会导致巨额的耗时计算,对显存对硬件要求更高了
HRNet结构细节
Backbone设计
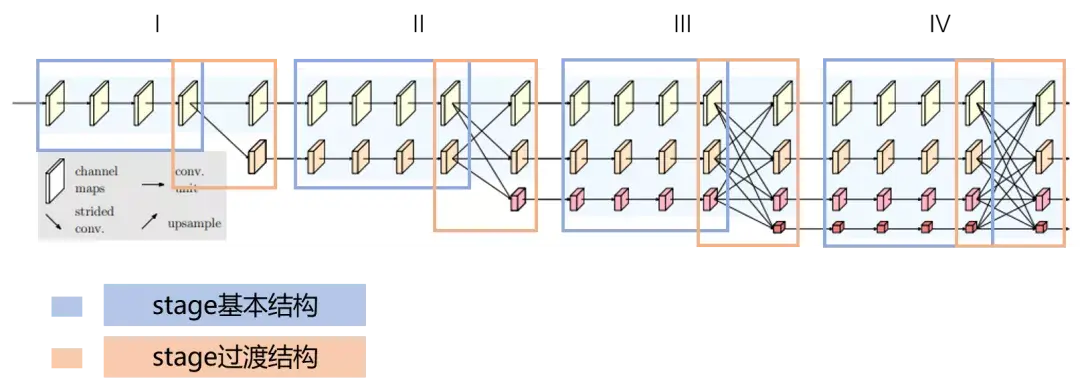
我将HRNet整个backbone部分进行了拆解,分成4个stage,每个stage分成蓝色框和橙色框两部分。其中蓝色框部分是每个stage的基本结构,由多个branch组成,HRNet中stage1蓝色框使用的是BottleNeck,stage2&3&4蓝色框使用的是BasicBlock。其中橙色框部分是每个stage的过渡结构,HRNet中stage1橙色框是一个TransitionLayer,stage2&3橙色框是一个FuseLayer和一个TransitionLayer的叠加,stage4橙色框是一个FuseLayer。
解释一下为什么这么设计,FuseLayer是用来进行不同分支的信息交互的,TransitionLayer是用来生成一个下采样两倍分支的输入feature map的,stage1橙色框显然没办法做FuseLayer,因为前一个stage只有一个分支,stage4橙色框后面接neck和head了,显然也不再需要TransitionLayer了。
整个backbone的构建流程可以总结为:make_backbone -> make_stages -> make_branches
有关backbone构建相关的看源码,主要讲一下FuseLayer、TransitionLayer和Neck的设计
FuseLayer设计
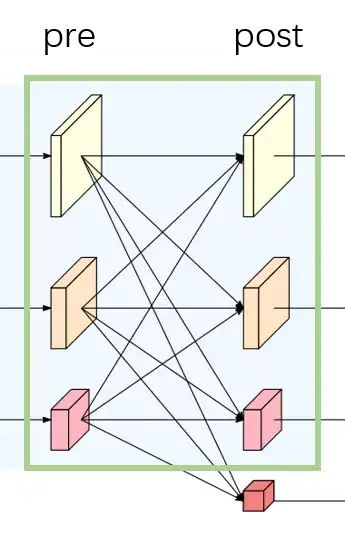
FuseLayer部分以绿色框为例,融合前为pre,融合后为post,静态构建一个二维矩阵,然后将pre和post对应连接的操作一一填入这个二维矩阵中。
以上图为例,图1的pre1和post1的操作为空,pre2和post1的操作为2倍上采,pre3和post1的操作为4倍上采;图2的pre1和post2的操作为3×3卷积下采,pre2和post2的操作为空,pre3和post2的操作为2倍上采;图3的pre1和post3的操作为连续两个3×3卷积下采,pre2和post3的操作为3×3卷积下采,pre3和post的操作为空。
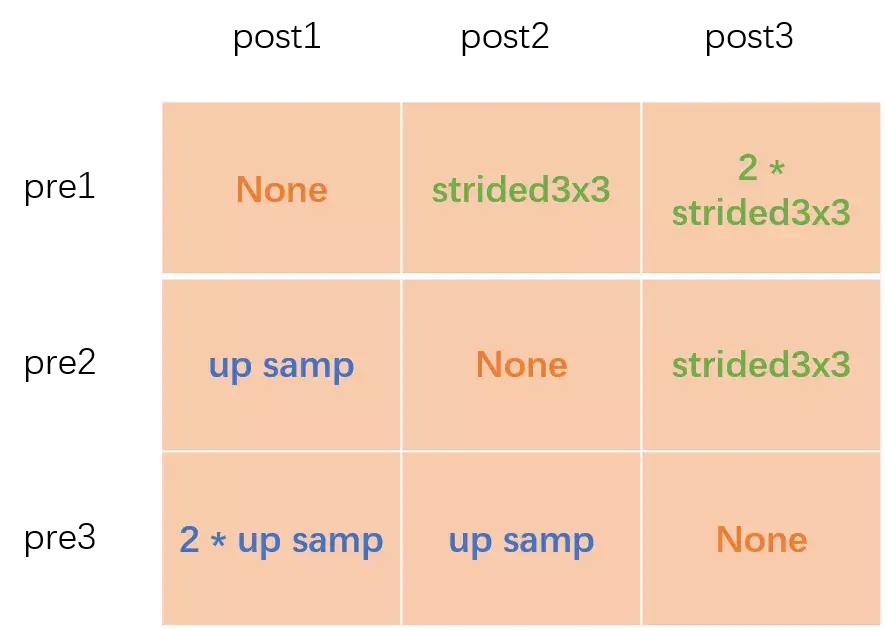
前向计算时用一个二重循环将构建好的二维矩阵一一解开,将对应同一个post的pre转换后进行融合相加。比如post1 = f11(pre1) + f12(pre2) + f13(pre3)
FuseLayer的整体code如下:
def _make_fuse_layers(self):
  fuse_layers = []
  for post_index, out_channel in enumerate(self.out_channels[:len(self.in_channels)]):
      fuse_layer = []
      for pre_index, in_channel in enumerate(self.in_channels):
          if pre_index > post_index:
              fuse_layer.append(nn.Sequential(
                  nn.Conv2d(in_channel, out_channel, 1, 1, 0, bias=False),
                  nn.BatchNorm2d(out_channel, momentum=0.1),
                  nn.Upsample(scale_factor=2**(pre_index-post_index), mode='nearest')))
          elif pre_index < post_index:
              conv3x3s = []
              for cur_index in range(post_index - pre_index):
                  out_channels_conv3x3 = out_channel if cur_index == post_index - pre_index - 1 else in_channel
                  conv3x3 = nn.Sequential(
                      nn.Conv2d(in_channel, out_channels_conv3x3, 3, 2, 1, bias=False),
                      nn.BatchNorm2d(out_channels_conv3x3, momentum=0.1)
                  )
                  if cur_index < post_index - pre_index - 1:
                      conv3x3.add_module('relu_{}'.format(cur_index), nn.ReLU(False))
                  conv3x3s.append(conv3x3)
              fuse_layer.append(nn.Sequential(*conv3x3s))
          else:
              fuse_layer.append(None)
      fuse_layers.append(nn.ModuleList(fuse_layer))
  return nn.ModuleList(fuse_layers)

def forward(self, x):
  x_fuse = []
  for post_index in range(len(self.fuse_layers)):
      y = 0
      for pre_index in range(len(self.fuse_layers)):
          if post_index == pre_index:
              y += x[pre_index]
          else:
              y += self.fuse_layers[post_index][pre_index](x[pre_index])
      x_fuse.append(self.relu(y))
TransitionLayer设计
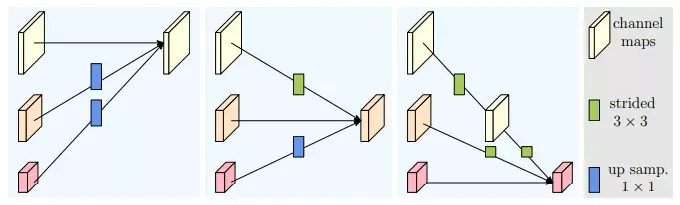
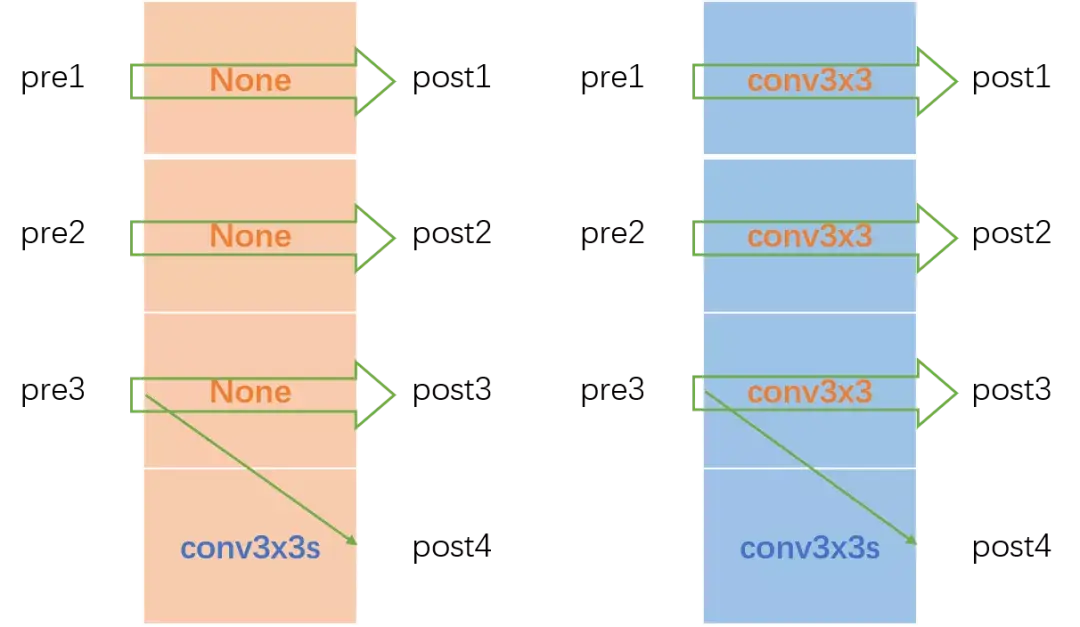
TransitionLayer以黄色框为例,静态构建一个一维矩阵,然后将pre和post对应连接的操作一一填入这个一维矩阵中。当pre1&post1、pre2&post2、pre3&post3的通道数对应相同时,一维矩阵填入None;通道数不相同时,对应位置填入一个转换卷积。post4比较特殊,这一部分代码和图例不太一致,图例是pre1&pre2&pre3都进行下采然后进行融合相加得到post4,而代码中post4通过pre3下采得到。
TransitionLayer整体code如下
def _make_transition_layers(self):
  num_branches_pre = len(self.in_channels)
  num_branches_post = len(self.out_channels)
  transition_layers = []
  for post_index in range(num_branches_post):
      if post_index < len(self.in_channels):
          if self.in_channels[post_index] != self.out_channels[post_index]:
              transition_layers.append(nn.Sequential(
                  nn.Conv2d(self.in_channels[post_index], self.out_channels[post_index], 3, 1, 1, bias=False),
                  nn.BatchNorm2d(self.out_channels[post_index], momentum=0.1),
                  nn.ReLU(inplace=True)
              ))
          else:
              transition_layers.append(None)
      else:
          conv3x3s = []
          for pre_index in range(post_index + 1 - num_branches_pre):
              in_channels_conv3x3 = self.in_channels[-1]
              out_channels_conv3x3 = self.out_channels[post_index] if pre_index == post_index - \
                  num_branches_pre else in_channels_conv3x3
              conv3x3s.append(nn.Sequential(
                  nn.Conv2d(in_channels_conv3x3, out_channels_conv3x3, 3, 2, 1, bias=False),
                  nn.BatchNorm2d(out_channels_conv3x3, momentum=0.1),
                  nn.ReLU(inplace=True)
              ))
          transition_layers.append(nn.Sequential(*conv3x3s))
  return nn.ModuleList(transition_layers)

def forward(self, x):
  x_trans = []
  for branch_index, transition_layer in enumerate(self.transition_layers):
      if branch_index < len(self.transition_layers) - 1:
          if transition_layer:
              x_trans.append(transition_layer(x[branch_index]))
          else:
              x_trans.append(x[branch_index])
      else:
          x_trans.append(transition_layer(x[-1]))
Neck设计
我把HRNet所描述的make_head过程理解成make_neck(因为一般意义上将最后的fc层理解成head更为清晰,这个在很多开源code中都是这样子拆解的)。下面着重讲解一下HRNet的neck设计。
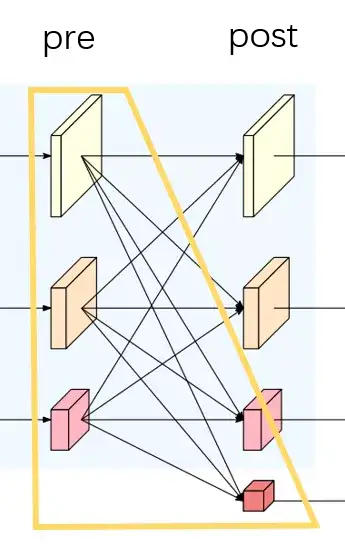
HRNet的backbone输出有四个分支,paper中给出了几种方式对输出分支进行操作。
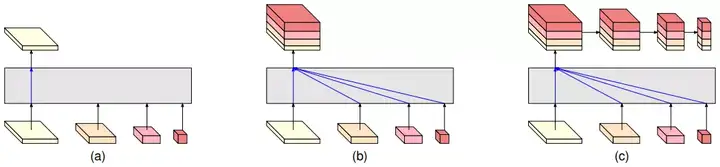
(a)图是HRNetV1的操作方式,只使用分辨率最高的feature map。
(b)图是HRNetV2的操作方式,将所有分辨率的feature map(小的特征图进行upsample)进行concate,主要用于语义分割和面部关键点检测。
(c)图是HRNetV2p的操作方式,在HRNetV2的基础上,使用了一个特征金字塔,主要用于目标检测。
而在图像分类任务上,HRNet有另一种特殊的neck设计
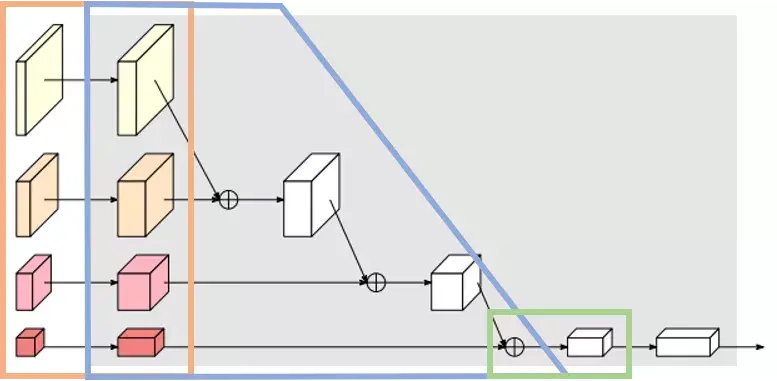
HRNet的neck可以分成三个部分,IncreLayer(橙色框),DownsampLayer(蓝色框)和FinalLayer(绿色框)。对每个backbone的输出分支进行升维操作,然后按照分辨率从大到小依次进行下采样同时从上到下逐级融合相加,最后用一个1x1conv升维。
def _make_neck(self, in_channels):
  head_block = Bottleneck
  self.incre_channels = [32, 64, 128, 256]
  self.neck_out_channels = 2048

  incre_modules = []
  downsamp_modules = []
  num_branches = len(self.in_channels)
  for index in range(num_branches):
      incre_module = self._make_layer(head_block, in_channels[index], incre_channels[index], 1, stride=1)
      incre_modules.append(incre_module)
      if index < num_branches - 1:
          downsamp_in_channels = self.incre_channels[index] * incre_module.expansion
          downsamp_out_channels = self.incre_channels[index+1] * incre_module.expansion
          downsamp_module = nn.Sequential(
              nn.Conv2d(in_channels=downsamp_in_channels, out_channels=downsamp_out_channels,
                        kernel_size=3, stride=2, padding=1),
              nn.BatchNorm2d(downsamp_out_channels, momentum=0.1),
              nn.ReLU(inplace=True)
          )
          downsamp_modules.append(downsamp_module)
  incre_modules = nn.ModuleList(incre_modules)
  downsamp_modules = nn.ModuleList(downsamp_modules)
  final_layer = nn.Sequential(
      nn.Conv2d(in_channels=self.out_channels[-1] * 4, out_channels=2048,
                kernel_size=1, stride=1, padding=0),
      nn.BatchNorm2d(2048, momentum=0.1),
      nn.ReLU(inplace=True)
  )
  return incre_modules, downsamp_modules, fine_layer

def forward(self, x):
  y = self.incre_modules[0](x[0])
  for index in range(len(self.downsamp_modules)):
      y = self.incre_modules[index+1](x[index+1]) + self.downsamp_modules[index](y)
  y = self.final_layer(y)
  y = F.avg_pool2d(y, kernel_size=y.size()[2:]).view(y.size(0), -1)
还有几个小细节
- BN层的momentom都设置为0.1
- stem使用的是两层stried为2的conv3x3
- FuseLayer的ReLU的inplace都设置为False